
10 Rules for Creating User Flows
Create clearer user flows with 10 practical rules covering personas, scope, happy paths, system outcomes, branching decisions, state changes and meaningful endings.
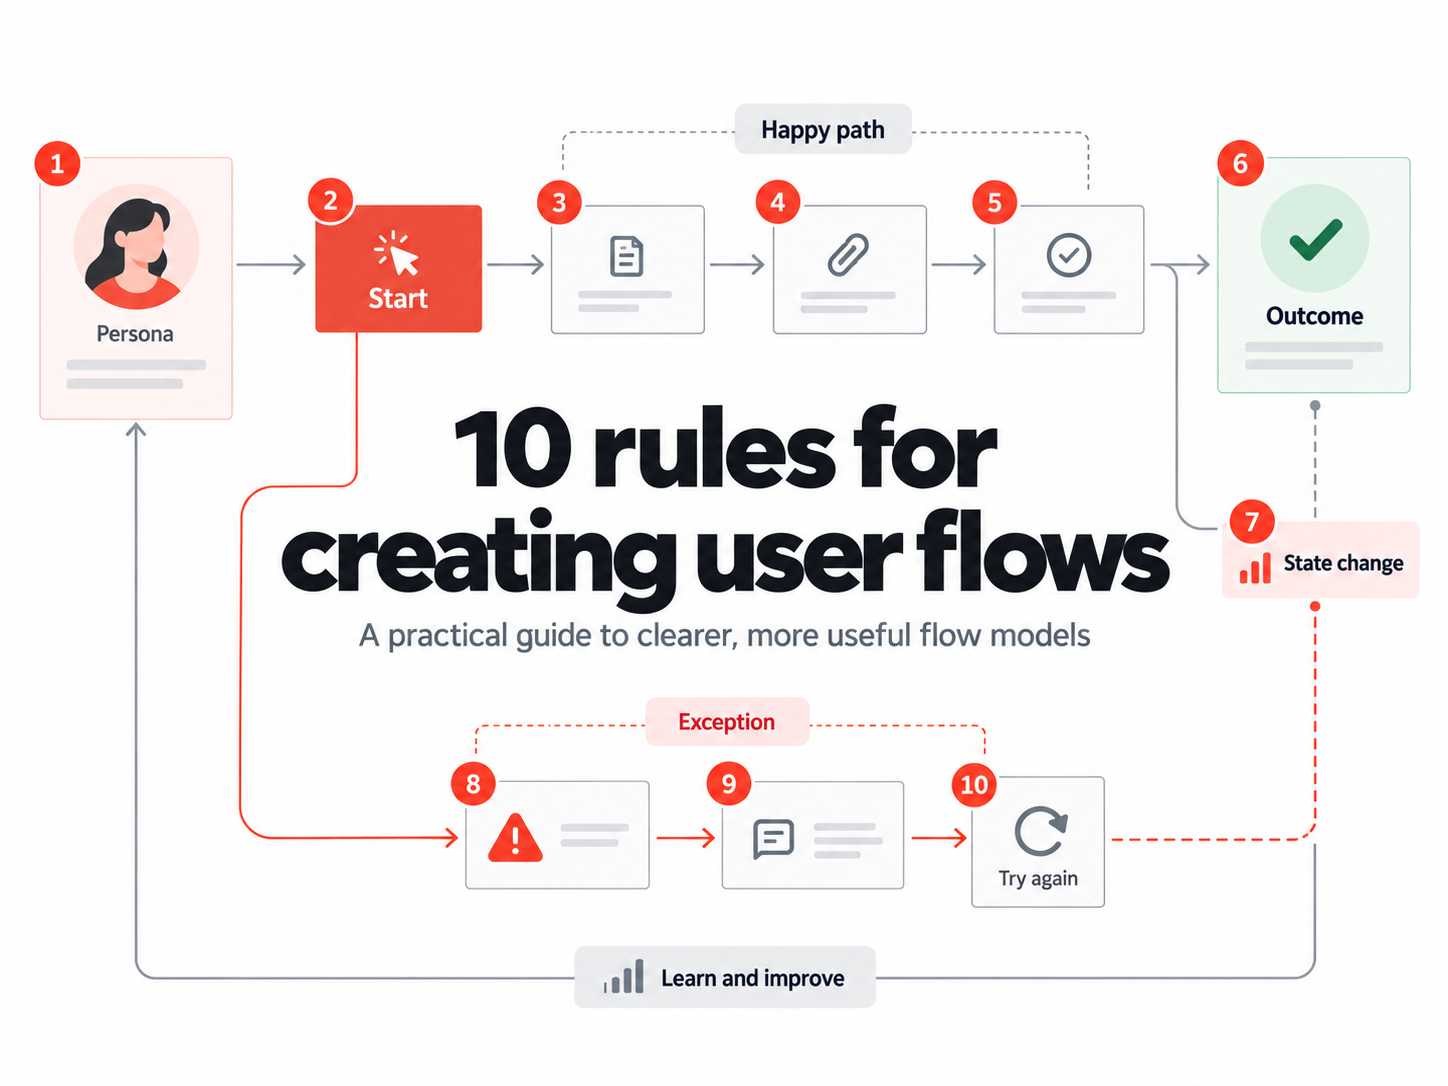
10 rules for creating user flows
User flows are one of the most useful tools we have for understanding how someone interacts with a digital product or service.
At their simplest, they show the actions a user takes and the paths they might follow to achieve something.
But creating a useful user flow involves more than connecting boxes with arrows.
I've seen flows that try to document an entire system on a single diagram, flows that only show what happens when everything goes right, and flows that move from one screen to another without explaining what the system actually does.
They might look complete, but they often leave important questions unanswered.
Over the years, I've developed a few rules that help me create flows that are easier to understand, review and maintain. They're not rules about which shapes to use or how a diagram should look. They're about how to approach the modelling itself.
Here are ten that I think make the biggest difference.
1. Every flow should have an assigned persona
Before you start creating a flow, you should know who you're creating it for.
Different users can interact with the same product in very different ways. They may have different permissions, responsibilities, objectives or levels of experience.
Consider a system that allows someone to submit an application and another person to review it.
The applicant and the reviewer might interact with the same application, but they're performing different activities, making different decisions and working towards different objectives.
Trying to combine both perspectives into a single flow can make it harder to understand what each person is actually doing.
Assigning a persona gives the flow a clear perspective.
That doesn't mean other people or systems can't be involved. A flow might include handovers, approvals or interactions between different roles. But there should be a clear understanding of whose experience you're modelling.
If you find yourself frequently switching between personas, it's worth asking whether you're actually trying to describe more than one flow.
2. Every flow should have one starting action
A flow should have a single, clearly defined starting action.
That might sound restrictive, particularly when users can reach the same part of a system in several ways.
But consider the old saying: You can't be in two places at once.
The same principle applies when modelling a user's actions.
At the beginning of a flow, the user is doing something specific. From that point, their actions and the system's responses determine what happens next.
If you find yourself adding multiple starting actions, ask whether you're describing different journeys that happen to lead to the same place.
For example, a user might access their account settings from the main navigation or from a prompt asking them to update their profile.
Both journeys may lead to the same functionality, but they have different starting contexts.
Keeping a single starting action makes the flow easier to follow and gives everyone reviewing it a shared understanding of where the journey begins.
It doesn't prevent branching. A flow can have many possible paths after that first action.
The important thing is that those paths all develop from the same starting point.
3. Define the objective of the flow and only include what's necessary
One of the easiest ways to make a user flow unnecessarily complicated is to include every action that happens before and after the thing you're trying to understand.
A flow should have a clear objective.
What are you trying to explore, explain or validate?
For example, imagine you're modelling how a user changes their notification preferences in Settings.
You could start with the user opening the website, logging in, navigating to their dashboard, opening the menu and selecting Settings.
But if the purpose of the flow is to understand how notification preferences work, do you really need all those steps?
Probably not.
It might be perfectly reasonable to start with the user selecting a notification preference within Settings.
The earlier navigation hasn't been forgotten. You've deliberately excluded it because it isn't relevant to the question you're trying to answer.
This is an important distinction.
Omitting unnecessary steps is good modelling. Accidentally overlooking important behaviour is not.
The objective of the flow should help you decide which details belong and which can be left to another flow.
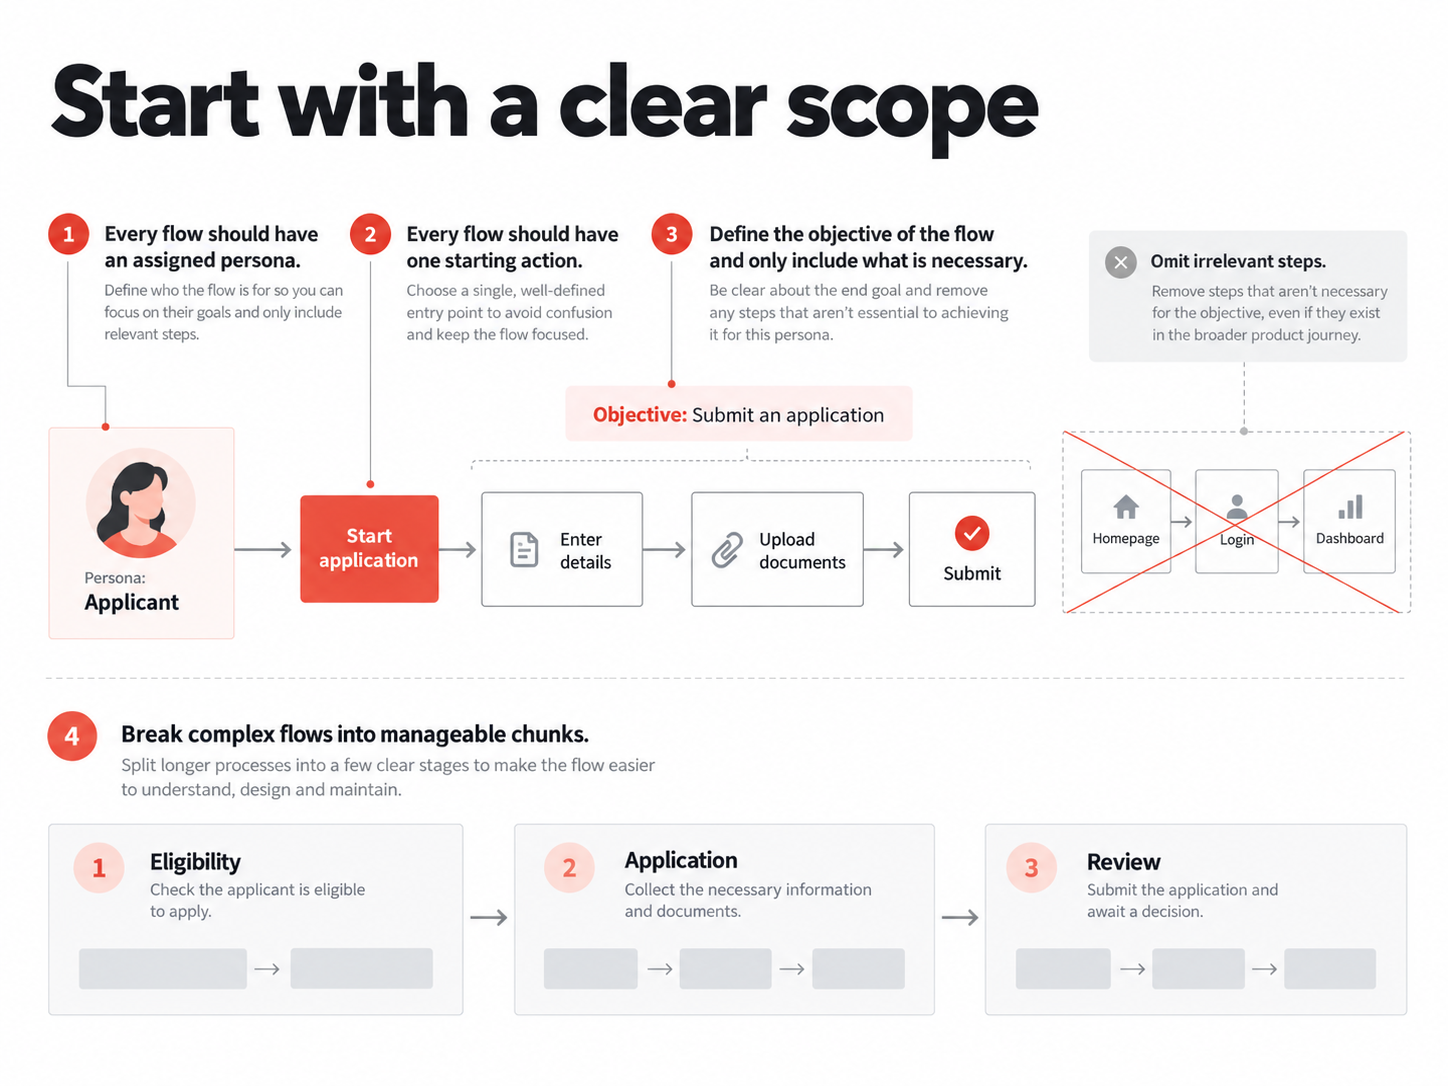
4. Break complex flows into manageable chunks
Complexity becomes much harder to manage when everything is presented together.
I once worked on a client project involving a 683-page document of business rules for a system.
The document was broken into 16 sections, allowing people to concentrate on a particular area rather than having to understand all 683 pages at once.
The same thinking applies to user flows.
Imagine trying to model an entire insurance application system in one flow.
You could have registration, authentication, application creation, eligibility checks, supporting documents, payments, approvals, notifications and ongoing account management.
All of those things are connected, but that doesn't mean they should be represented in one enormous diagram.
Breaking them into smaller flows makes each area easier to understand.
It also makes the flows easier to review with the people who understand that part of the business or system.
You don't need everyone to understand every detail of the entire service before they can contribute something useful.
The challenge is finding sensible boundaries.
A flow should be large enough to provide meaningful context, but small enough that someone can understand what it's trying to achieve without getting lost.
5. Use high-level flows for the happy path, but explore the unhappy paths in detail
There's nothing wrong with creating a high-level flow that shows how someone successfully moves through a product or service.
In fact, it's often a useful starting point.
It helps establish the overall journey and gives stakeholders a shared understanding of what the service is intended to do.
But a happy path isn't a complete description of how a system behaves.
Consider an online application process.
A high-level flow might show:
- Start application
- Complete details
- Submit application
- Receive confirmation
That's useful for explaining the overall experience.
But what happens when the information is incomplete? What if the user isn't eligible? What if they save their application and return later? What happens when submission fails?
Those questions are often where the real complexity sits.
Rather than forcing every possibility into the high-level diagram, use more detailed flows to explore the individual parts of the process.
The high-level flow explains how the service fits together. The detailed flows explain how the different parts actually work, including when things don't go to plan.
Both have value, but they serve different purposes.
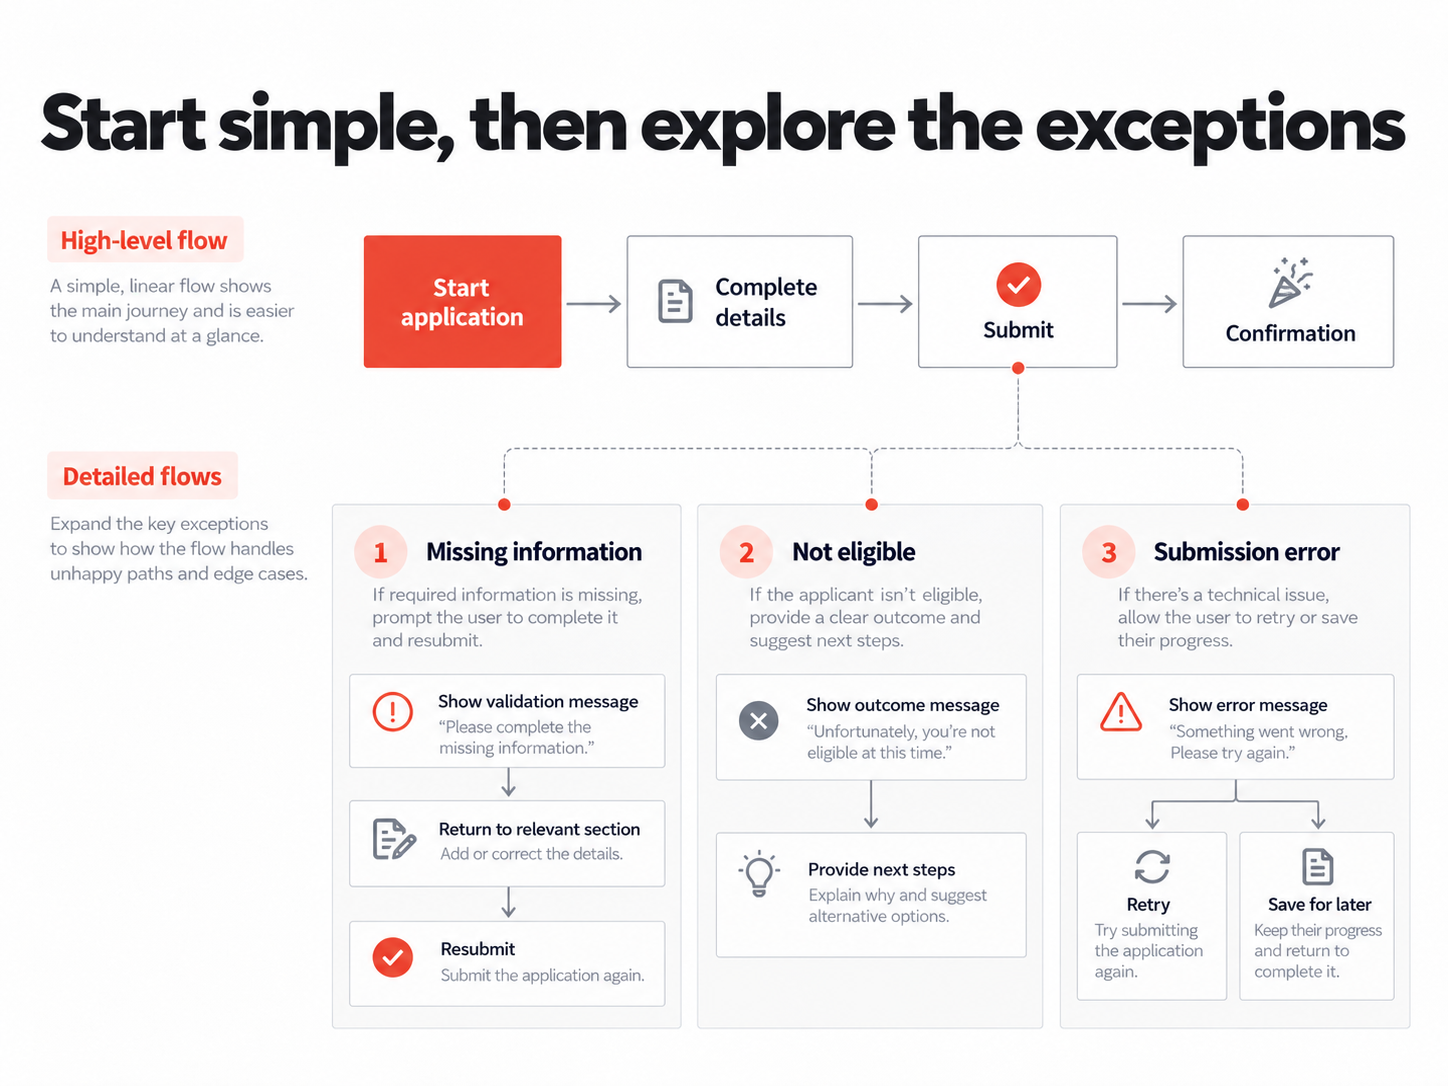
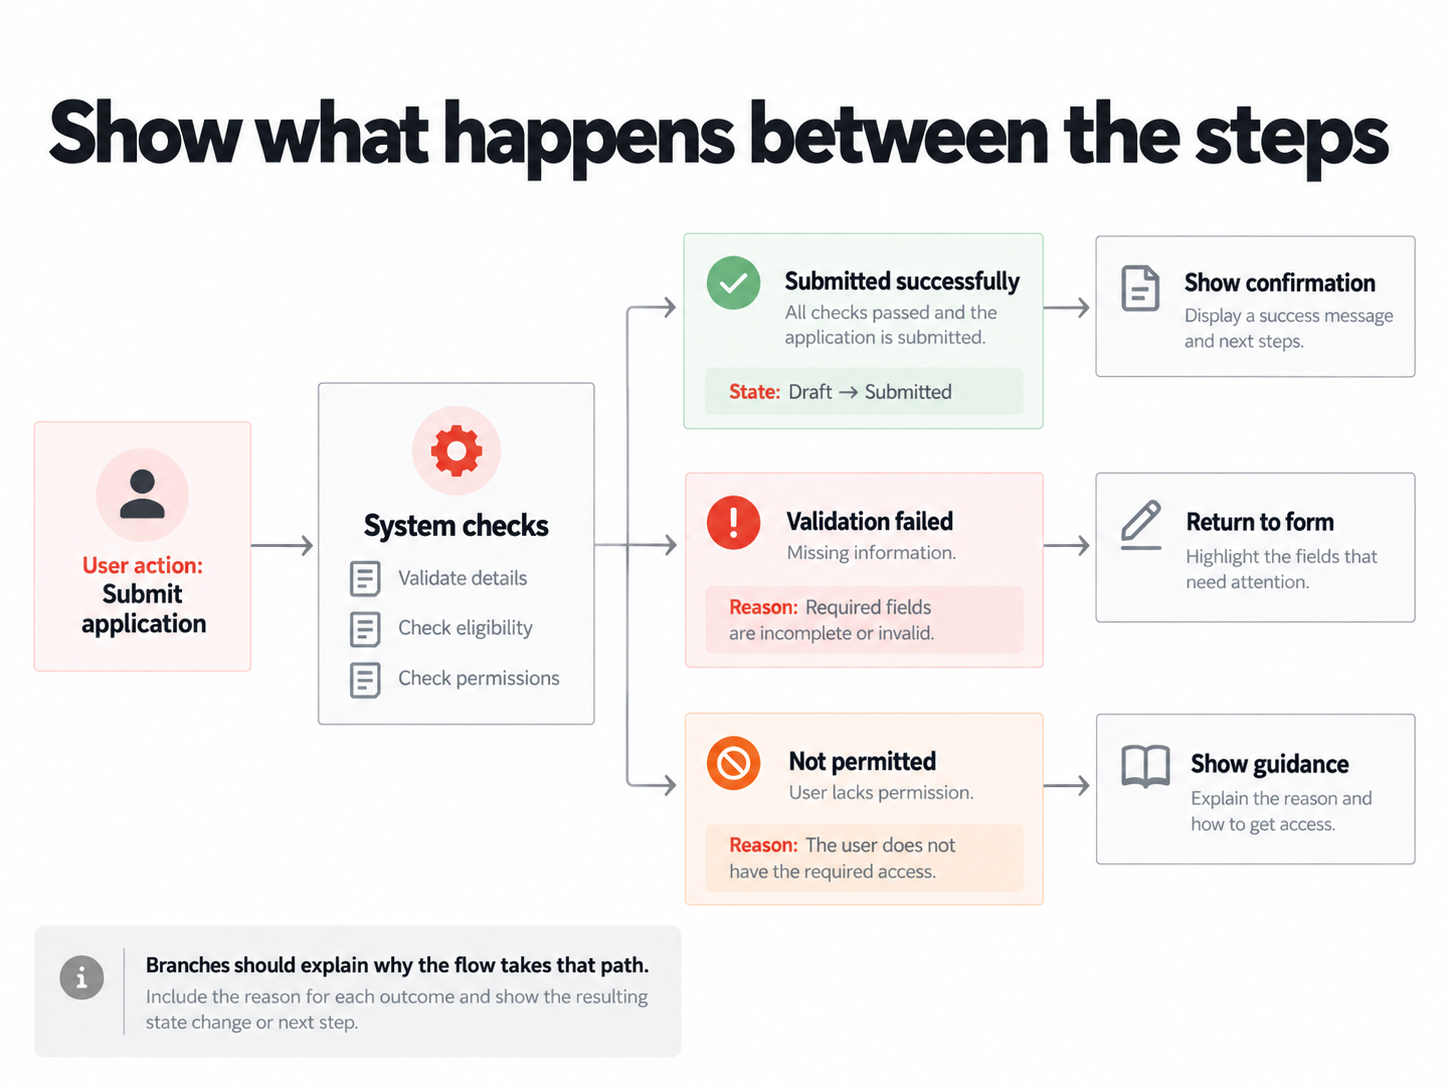
6. Every user action should have a corresponding system outcome
One of the most important questions to ask when creating a user flow is:
What does the system do in response to this action?
Traditional user flow diagrams often show one user action leading directly to another.
The user submits a form, and the next box shows a confirmation page.
But there's something important missing between those two actions.
The system has to respond.
It might validate the form, check whether the user has permission to submit it, save the information, trigger another process or return an error.
Those outcomes determine what the user can do next.
For example:
User action: Submit an application.
Possible system outcomes:
- The application passes validation and is successfully submitted.
- Required information is missing.
- The user doesn't have permission to submit.
- The submission fails because of a system error.
Each outcome may lead to a different next action.
If we only show the successful path, we're leaving the other possibilities for someone else to discover.
This doesn't mean a user flow needs to document every technical operation happening behind the scenes.
It means we should make the system behaviour that affects the flow visible and understandable.
7. Make it clear why a flow takes a particular path
Branching is a natural part of user flows.
But showing that a flow can go in several directions isn't enough.
We also need to understand why it takes one path rather than another.
Imagine a user attempting to log in.
The flow might branch into successful login, incorrect credentials or account locked.
Those are three possible outcomes, but the diagram should make it clear what determines each one.
Otherwise, we're simply showing that different things might happen without explaining the circumstances.
This becomes particularly important in systems with business rules, permissions, eligibility criteria or complex validation.
For example, an application might require different supporting documents depending on the applicant's circumstances.
It's not enough to show two paths.
We need to understand what determines which path applies.
When the reason for a branch isn't clear, that's often a sign that an underlying business rule or requirement still needs to be defined.
And identifying that unanswered question is one of the reasons for creating the flow in the first place.
8. Show when something changes state
A user flow shouldn't only describe what happens next.
It should also make important changes to the state of the system visible.
For example, an application might move through several states:
Draft → Submitted → Under Review → Approved
Those state changes can have a significant effect on how the product behaves.
A user may be able to edit an application while it's in Draft, but not once it's Submitted.
A reviewer may only be able to approve an application when it's Under Review.
A user returning to the system might see different actions depending on the application's current state.
If we don't capture those changes, we risk creating flows that describe what users can do without understanding when they're allowed to do it.
State changes don't need to happen after every action.
Opening a menu or viewing a page might not change anything meaningful.
But when an action changes the status, permissions or availability of something, that change should be considered as part of the flow.
It helps explain not just where the user goes next, but what has changed as a result of what happened.
9. Every path should lead somewhere meaningful
It's surprisingly easy to create a flow where a path simply stops.
Sometimes that's intentional. The user has completed the task, cancelled the process or reached an outcome that prevents them from continuing.
But sometimes the path stops because nobody has worked out what should happen next.
Consider a payment flow.
A successful payment might lead to an order confirmation.
But what happens when a payment is declined?
Can the user try another card? Can they retry the same payment? Can they return to their order without losing what they've entered?
If the flow simply ends at "Payment declined", we may be missing important behaviour.
Every path should lead to another action, return to an earlier part of the process, or reach a clearly defined ending.
That ending doesn't always have to be successful.
A rejected application, an abandoned process or a cancelled transaction can all be legitimate outcomes.
The important thing is that the ending is intentional.
When reviewing flows, look for paths that seem to disappear.
They often reveal unanswered questions about how the product is expected to behave.
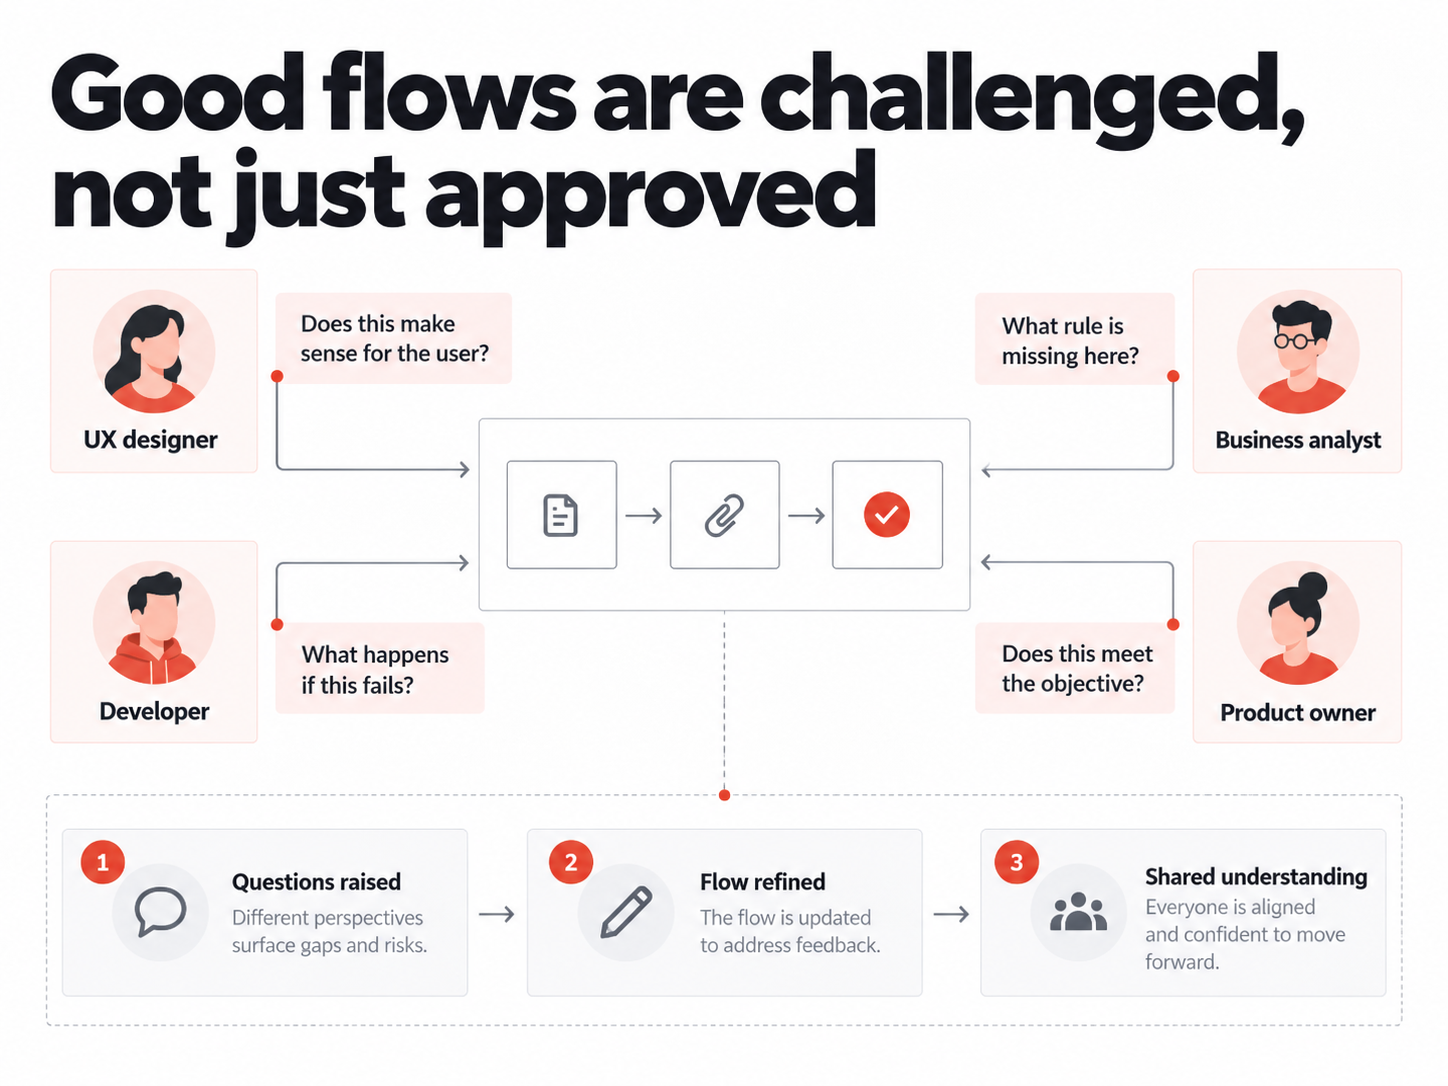
10. User flows should be challenged, not simply approved
A user flow shouldn't be treated as a diagram that someone creates and everyone else signs off.
It should be a tool for discussion.
Different people bring different perspectives to the same flow.
A UX designer might question whether an interaction makes sense for the user.
A business analyst might identify a missing rule or an exception that hasn't been considered.
A developer might recognise a technical constraint or ask what should happen if a process fails.
A product owner might question whether the proposed behaviour actually meets the business objective.
Those conversations are valuable.
In fact, a flow that generates questions can be more useful than one that everyone agrees with immediately.
The goal isn't to create something that looks complete as quickly as possible.
It's to build a shared understanding of how the product or service needs to work.
And that understanding will change.
New requirements emerge, assumptions are challenged, technical constraints become clearer and decisions are made.
Your flows should evolve with that knowledge.
They can continue to support discussions throughout design, development and testing, rather than becoming documents that are filed away once the initial design work is complete.
The goal isn't to create more diagrams
These ten rules aren't about producing bigger, more detailed or more complicated user flows.
Quite the opposite.
They're about creating flows that focus on the right things, make important behaviour visible and help people understand the decisions that shape a digital product or service.
A useful flow doesn't need to contain every detail of the system.
But it should make the relevant actions, outcomes, decisions and state changes clear enough that the people working on the product can understand what's supposed to happen.
And when something isn't understood, the flow should help make that gap visible.
Because the real value of creating a user flow isn't the diagram itself.
It's the shared understanding that comes from working through it.